
How to Create a Multi-Vendor Marketplace in WordPress – 5 Easy Steps

Building a multi-vendor marketplace on WordPress is now simpler than ever. A marketplace allows multiple sellers to list their products or services, giving customers a place to browse, compare, and buy—all from one platform.
Think of how Amazon, Etsy, or eBay operate – each offers a shared space where independent vendors thrive. The good news is, you can build something similar without coding knowledge or a big development team.
With WordPress and a powerful multi-vendor plugin like Dokan, you can launch a fully functional marketplace in no time. You’ll have full control over branding, vendor management, payments, shipping, and commissions, all from a single, intuitive dashboard.
In this guide, we’ll walk you through the entire process from installing Dokan and selecting the right theme to adding products, onboarding vendors, and promoting your marketplace to attract customers and grow your business.
So, let’s get started!
Why Should You Create a Marketplace in 2025
Online marketplaces are experiencing unprecedented growth, opening major opportunities for entrepreneurs and businesses.
In 2025, global eCommerce retail sales are projected to reach $6.42 trillion, up about 6.9 % year-over-year. This surge supports the growing consumer preference for online shopping platforms that offer a wide array of products and services.
Why Buyers Prefer Marketplaces
Consumers favor marketplaces for several clear reasons:
- Variety & Convenience: Marketplaces serve as a one-stop shop where buyers browse multiple sellers, compare prices, and make informed decisions.
- Trust & Security: Established platforms often provide buyer protection policies, secure payment gateways, and customer reviews, which boost confidence in the purchasing process.
- Competitive Pricing: With several sellers competing in the same space, consumers frequently find better deals and savings.
Benefits for Sellers
For sellers, marketplaces offer an accessible entry point into eCommerce:
- Reduced Overhead Costs: Sellers can avoid the expenses of developing and maintaining their own storefronts.
- Built-in Customer Base: Established marketplaces already attract customers, lowering the effort required to reach buyers.
- Integrated Tools & Services: Many marketplaces include built-in tools for inventory, payment processing, shipping, and marketing, streamlining operations.
By building your own marketplace, you’re not just creating a website – you’re creating a dynamic business that connects buyers and sellers, leverages a thriving and expanding market, and delivers unique value.
With the right tools and strategy, you can carve out your space in the rapidly evolving digital commerce ecosystem and build a sustainable, profitable venture.
How to Build an Online Marketplace with Dokan in 5 Easy Steps
You can build a full-featured online marketplace quickly with the Dokan multivendor plugin. We’ll walk you through the steps. First, a quick look at the Dokan plugin.
Dokan is a leading WordPress plugin for multi-vendor marketplaces. It has over 50,000 active installs on WordPress.org and more than 40+ modules that add powerful features. That makes it one of the most popular choices for marketplace builders.
Dokan runs on top of WooCommerce. That means it works with WooCommerce themes and extensions out of the box. You need very little custom code to get started.
Ready to build?
Let’s go step-by-step and set up your marketplace using Dokan.
Step 1: Activate Dokan to Create Your Multivendor Marketplace
We are assuming you have already set up and configured WooCommerce on your WordPress website.
Now, installing Dokan multivendor is as simple as installing any other WordPress plugin.
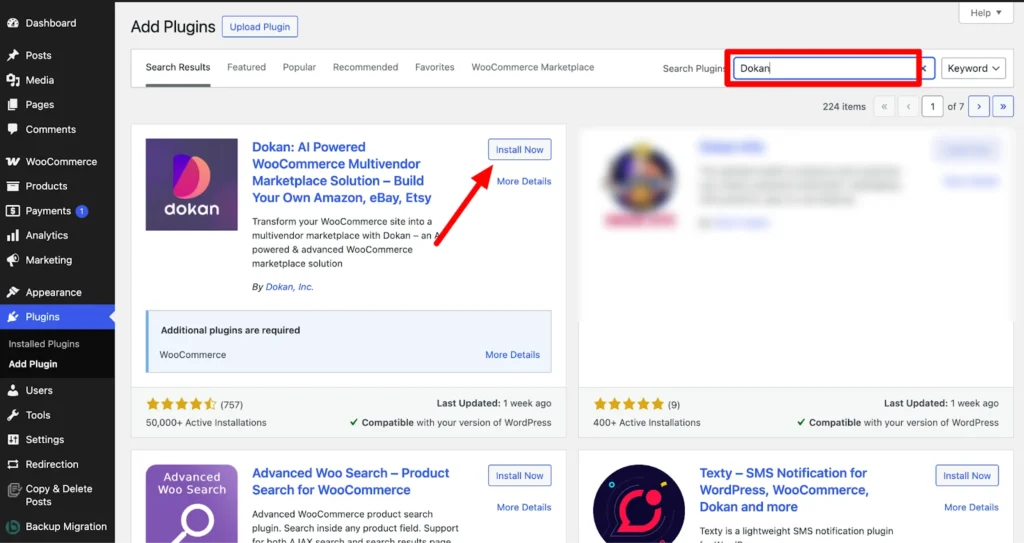
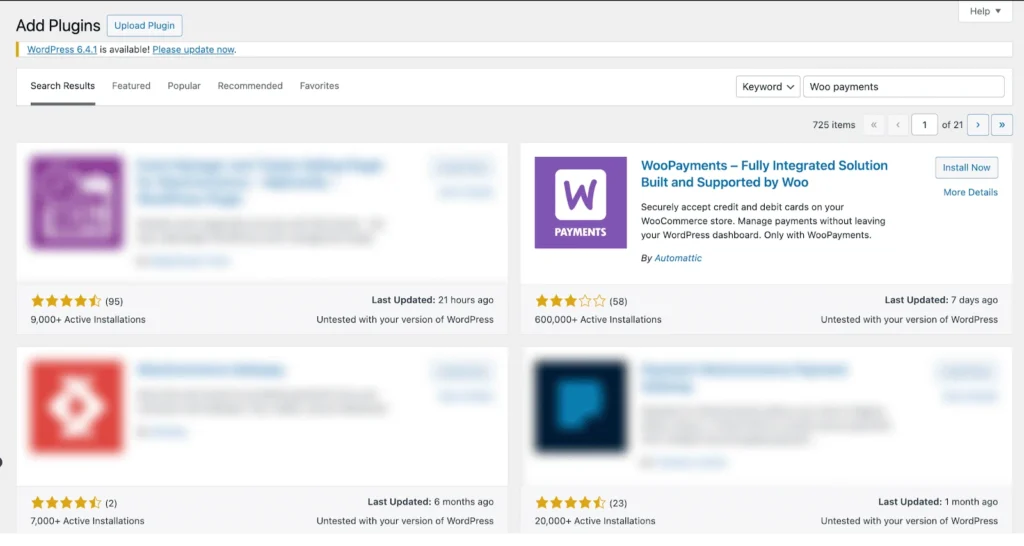
You can install the plugin from the WordPress dashboard by,
- Navigating to Admin Dashboard -> Plugin-> Add New-> Click the search
- Type Dokan -> Install -> Activate.
Dokan Multivendor will also provide a setup wizard that will help you easily set up your marketplace. Configuring Dokan is very easy by using its own Wizard.
Step 2: Install a Dokan Compatible Theme
Once you’ve installed the Dokan multivendor plugin, the next step is to choose a compatible theme. Any theme that works with WooCommerce will also work with Dokan.
For convenience, you can use Dokan’s own theme, Dokani, which is built specifically for marketplaces.
To install a theme, go to WP Admin → Appearance → Themes and select a theme that is Dokan-compatible.
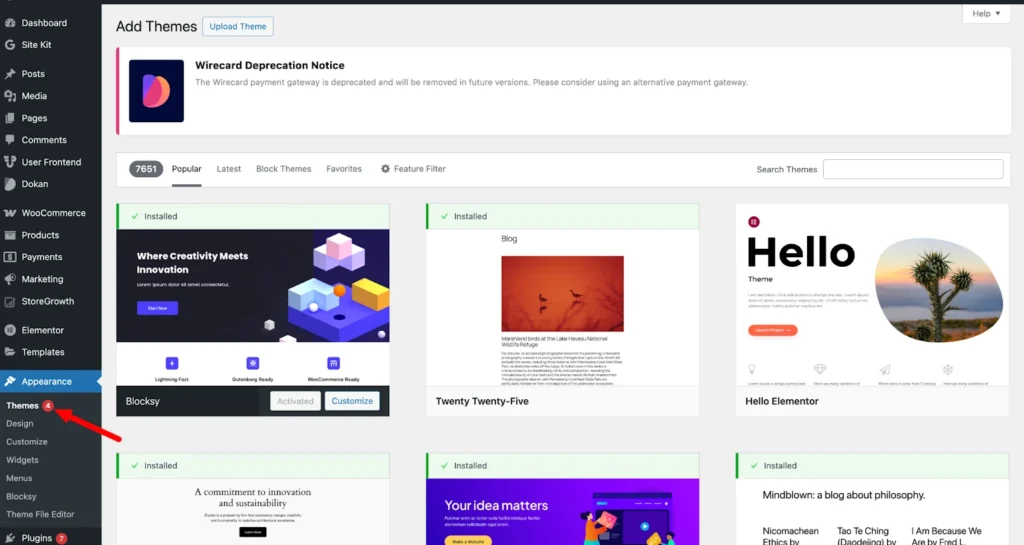
If you choose any other theme, then you will need to customize the theme to make it compatible with your marketplace.
Step 3: Configure Dokan General Settings
After installing and activating the Dokan multivendor plugin, the next step is to configure the basic settings. You can find all the settings options in WP Admin → Dokan → Settings.
Here, you can:
- Set up your store’s terms and conditions
- Create store categories, allowing vendors to add different categories to their stores
- Enable payment gateways
- Configure withdrawal methods
- Allow vendors to upload new products
- Create new product tags
- Set product status
- Configure selling options
- Set a privacy policy
![]()
Make sure to click Save Changes after configuring your settings, or your updates won’t be applied.
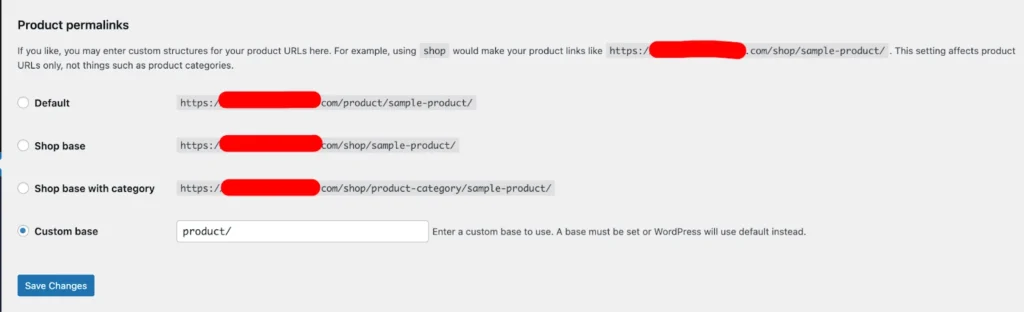
You also need to adjust your permalink settings to prevent 404 errors on some pages. Go to WP Admin → Settings → Permalinks → Product Permalinks, select the Custom Base option, and enter /product in the box. This will ensure your product pages have the correct URL structure.
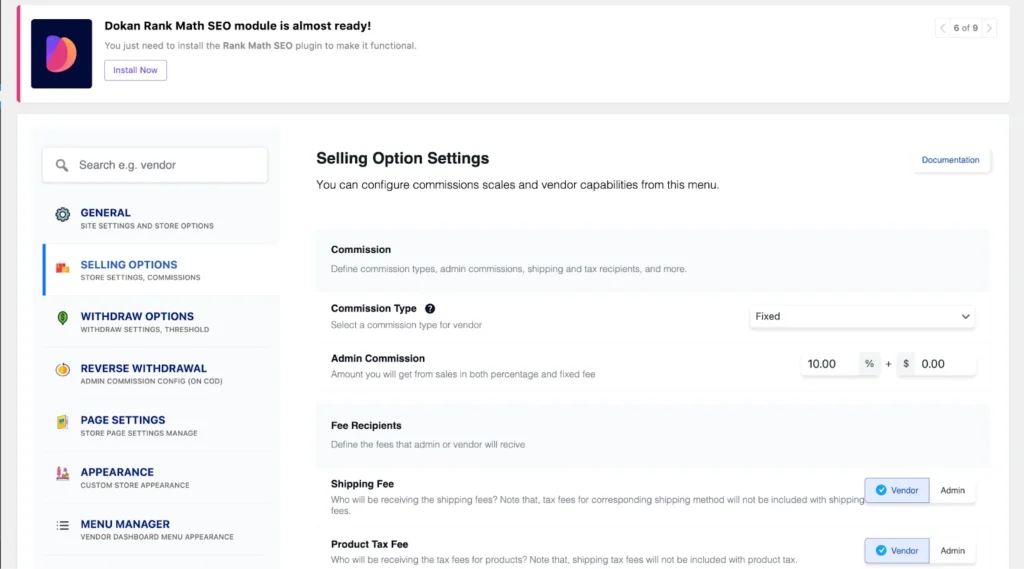
You also need to set your commission rate. To do this, go to WP Admin Dashboard → Dokan → Settings → Selling Options → Admin Commission.
You’ll have different options to set the commission as a percentage or a fixed amount. Dokan supports various types of vendor commissions, giving you flexibility in how you charge sellers.
Enable the Payment Gateways
The Dokan multivendor plugin works with all WooCommerce-compatible payment gateways, giving you plenty of options to handle transactions on your marketplace.
With the free version of Dokan, you can use basic payment methods like check payments, bank transfers, and cash on delivery. To accept more advanced payments, including credit and debit cards, you can install the WooPayments plugin, which supports a wide range of payment options.
However, if you want your marketplace to support adaptive payment solutions like Stripe Connect and MOIP you need to install the Dokan Pro version.
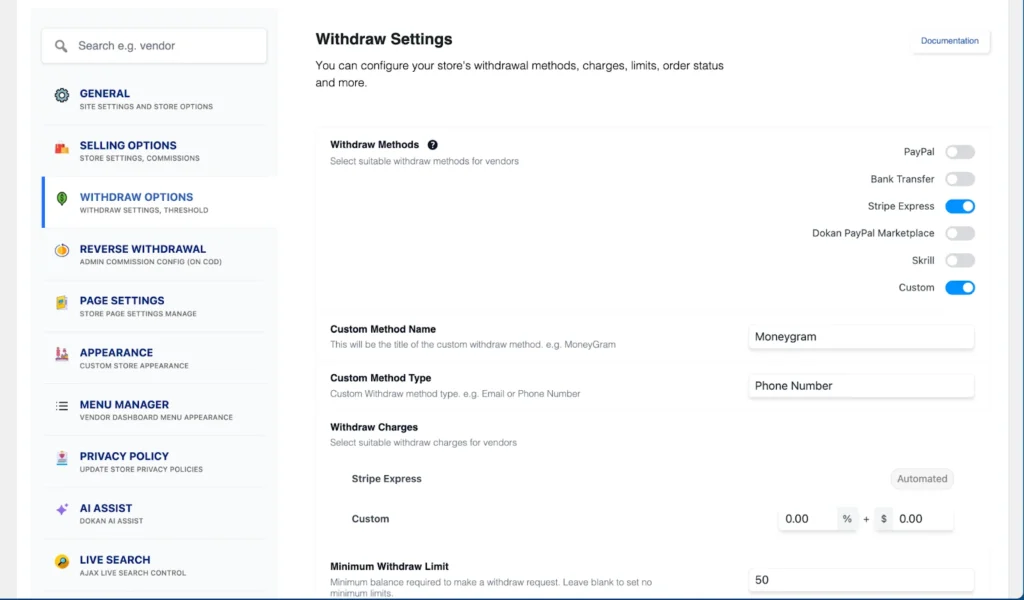
Enable Withdraw Methods for Vendors
A reliable withdrawal system is essential for any online marketplace, and the Dokan multivendor plugin makes it simple to manage.
To set it up, go to WP Admin → Dokan → Settings → Withdraw Options. Here, you can choose the withdrawal method and set the minimum balance a vendor must have before requesting a payout. This ensures vendors can access their earnings smoothly and efficiently.
Step 4: Upload Products and Set Up Admin Shop If You Want
This step is optional, but if you want to earn extra income, you can set up your own store on the marketplace.
To start, go to Dokan → Vendors and enable selling by toggling the button. Then, add your products by going to WordPress Backend → Products → Add New. This lets you list your items on the marketplace just like any other vendor.

And to upload products from the frontend, navigate to WordPress Dashboard -> Vendor Dashboard -> Products-> Add New. Your registered vendors will upload products this way.

Vendors can add functionalities like shipping, taxes, and product attributes from the product creation form.
Step 5: Allow Vendors to Sign up to Your Marketplace
Now that you have added all the functionalities to your marketplace, you can invite vendors to sign up for your marketplace.
Dokan multivendor has a default registration form that will help vendors to sign up to your marketplace.
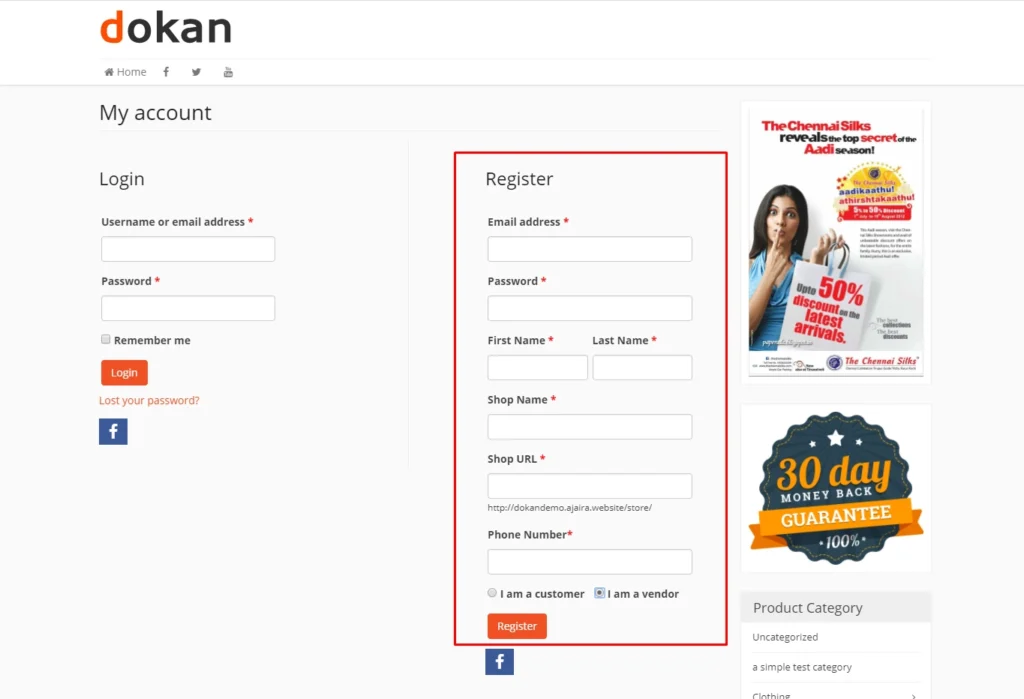
You can create custom registration forms with the fields you need for your marketplace.
To let vendors start selling, go to Dokan → Vendors and toggle the selling status on.
If you want vendors to add products, go to Dokan → Settings → Selling Options and enable New Vendor Product Upload. This allows vendors to upload and manage their products on your marketplace.

Vendors can upload their products from the front end, as we’ve shown above for the admin shop.
Now you are ready to sell!
How to Promote Your Marketplace
Promoting your marketplace is just as important as building it. Even the most feature-rich platform can go unnoticed without the right visibility. A solid promotion strategy helps you attract buyers, onboard vendors, and create a trustworthy brand.
In 2025, with online marketplaces booming, leveraging multiple marketing channels is essential to stand out and grow faster.
Social Media
Stay active across Facebook, Instagram, X (Twitter), and LinkedIn. Post consistently—around 4–5 times a week. Showcase products, spotlight vendors, and share marketplace updates or behind-the-scenes moments. Use reels, carousel posts, and short videos to spark engagement. Track performance using tools like Meta Business Suite or Hootsuite to measure reach, clicks, and engagement.
Content Marketing
Publish 1–2 high-quality blog posts weekly based on your niche. Try topics like “Best-Selling Products of Summer 2025” or “How to Find Trusted Sellers Online.” Build a knowledge base for your audience.
Optimize your articles for SEO, track traffic with Google Analytics, and repurpose blogs into infographics, emails, or short video snippets for social media. Quality, consistent content builds trust and organic reach over time.
Email Marketing
Send newsletters once or twice a week featuring new products, vendor stories, and exclusive deals. Segment your audience by behavior or interests for better results.
Use automation for welcome emails, cart recovery, and special promotions. Track open rates, clicks, and conversions to keep improving your campaigns.
Paid Ads
Run paid ads on Google, Facebook, and Instagram to reach new audiences. Start small, test different creatives, and focus on retargeting campaigns for visitors who didn’t convert.
Use custom and lookalike audiences to increase precision. Monitor metrics like clicks, conversions, and ROI, and keep refining your ads for better performance.
Influencer Marketing
Collaborate with micro and mid-tier influencers (5K–50K followers) in your niche. Have them review your vendors’ products, share unboxing videos, or post authentic stories.
Use UTM links to track sales and traffic. Running campaigns around seasonal offers or big sale events can maximize visibility and conversions.
Affiliate Partnerships
Invite bloggers, creators, and niche websites to promote your marketplace as affiliates. Offer them a commission for every sale they drive.
Use affiliate tracking tools to measure performance, reward top affiliates, and keep your partners motivated to promote consistently.
Community & Event Marketing
Be active in online forums, Facebook groups, and local communities relevant to your niche.
Host webinars or sponsor small events to showcase your vendors and share valuable insights. Building genuine connections strengthens your marketplace’s reputation and earns long-term trust.
FAQs
Q: How do I approve or manage new vendors?
You can review vendor applications directly from the Dokan dashboard and approve or reject them to maintain marketplace quality.
Q: Can I set different commission rates for each vendor?
Yes. Dokan allows flexible commission settings—percentage-based or fixed—and you can assign unique rates to individual vendors.
Q: How can vendors manage their own products?
Each vendor has a dedicated dashboard where they can add, edit, or remove products, manage orders, and handle their store settings independently.
Q: Can I create product variations like size or color?
Yes. Vendors can add product variations such as size, color, or material, allowing buyers to choose exactly what they want.
Q: How do I handle refunds and returns?
You can manage refunds manually or allow vendors to process them based on your settings. All refund activity is logged for complete transparency.
Start Your Marketplace Today
Creating a successful online marketplace with WordPress is easier than ever. With Dokan, you can build a platform where vendors sell, customers shop, and your brand grows—all without writing a single line of code.
The eCommerce industry is expanding quickly, and there’s still room for new players in every niche. Starting now gives you the advantage to establish trust, attract early vendors, and build a loyal community of buyers.
Your marketplace could be the next go-to destination for your niche. Start small, stay consistent, and keep improving — the sooner you launch, the sooner you grow.
